Starting a press-on nail business holds immense creative and financial potential, yet the journey often begins with a common challenge: navigating the vast sea of nail products. With hundreds of brands and thousands of items on the market, the initial investment can feel overwhelming, and costs can quickly escalate. But what if you could cut through the noise and identify the absolute essentials? As our expert in the video shares, having run a successful press-on nail shop for over a year, she’s distilled her extensive collection down to the core 10 (plus a bonus!) items that truly matter for getting started. This guide will expand on her invaluable insights, offering a deeper dive into each product category to help you build your foundation with confidence and clarity.
Building Your Foundation: Essential Tools for Press-On Nails
Every great creation begins with a solid foundation. For your press-on nail business, this means investing in the right tools and materials. Let’s break down the must-haves, starting with the often-overlooked aspect of safety.
Safety First: Protecting Your Health and Craft
Before diving into the vibrant world of colors and designs, prioritize your well-being. The video wisely emphasizes two non-negotiable items:
- Nitrile Gloves: Imagine uncured gel as a sneaky liquid with tiny chemical agents called monomers. If these make prolonged contact with your skin, they can gradually seep into your bloodstream. Over time, this exposure can trigger allergic reactions, leading to irritation, redness, and even chronic sensitivity. Nitrile gloves act as an essential barrier, much like a shield, protecting your skin from these potential irritants. They are durable, offer good dexterity, and are widely available.
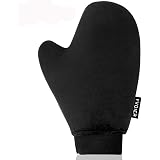
- Face Mask: When you’re filing or buffing nail tips, tiny particles of plastic dust become airborne. Just as you wouldn’t want to breathe in sawdust or other fine debris, you certainly don’t want these microplastics entering your lungs. A simple face mask, like the surgical masks often used, provides effective protection against inhaling these particles. It’s a small step that offers significant long-term health benefits, akin to wearing safety goggles when performing DIY tasks.
Nail Tips: The Canvas for Your Creativity
The full-cover nail tip is the very canvas upon which your press-on nail art will come to life. The speaker highlights the importance of choosing wisely, as not all tips are created equal. These tips come in a dazzling array of shapes (think almond, coffin, stiletto, square, round) and lengths (short, medium, long, extra-long).
When you’re just starting your press-on nail business, it’s unnecessary to acquire every single shape and length. A smarter approach is to begin with what you know. Consider:
- What nail shapes and lengths do you personally enjoy wearing?
- What styles are popular among your friends or local community?
- Which shapes do you see frequently requested online or in beauty trends?
The video points out that “short almond” is a best-seller for many, but this can vary based on your target demographic. The key is to start small, perhaps with 2-3 popular shapes, and expand your inventory as you learn more about your customers’ preferences. For instance, if your clientele values a natural look, a brand like Apres, known for its thin cuticle design and durable tips, might be a perfect fit, offering a seamless integration with the natural nail bed.
Nail Stands: Steadying Your Artistry
Imagine trying to paint a miniature masterpiece on a wobbling surface – it’s nearly impossible! Nail stands provide the stable platform you need for precise application. The video shares a “hot tip” many beginners overlook: not all nail stands offer the same level of stability and convenience. The difference, often subtle to the untrained eye, can significantly impact your workflow and the quality of your finished press-ons.
Here’s why solid acrylic stands often outperform their hollow, silver counterparts:
- Enhanced Stability: Solid acrylic stands, with their greater weight, are far less prone to tipping over during the intricate painting and curing processes. This stability is crucial, preventing smudges, uneven application, and frustrating mishaps.
- Optimal Width for All Sizes: Smaller nail tips can be a nightmare to paint on narrow stands. Acrylic stands typically offer a wider surface, providing ample room to comfortably paint even the smallest sizes without accidentally coating the stand itself. This saves you valuable time and effort in correcting mistakes later.
While often sold with a tacky putty, the video suggests an even more secure method for attaching tips to your stands: nail tabs. These provide a firmer grip, ensuring your nail tips remain perfectly in place as you work your magic.
Files and Buffers: Refining Your Press-On Perfect
Even the most perfectly manufactured nail tips might need a little refinement. Files and buffers are your essential tools for achieving a smooth, professional finish. Much like a sculptor hones their creation, these tools allow you to perfect the shape and texture of your press-ons.
- Files: These are indispensable for removing any small plastic nubs or “flash” left over from the manufacturing process. A quick pass with a file ensures a clean edge. Furthermore, files allow you to subtly reshape the tip, perhaps softening a corner or refining an angle, to achieve your desired aesthetic.
- Buffing Blocks: A buffing block is like a gentle sander for nails. It helps to create a slightly textured surface on the nail tip, which is vital for proper adhesion of gel polish. This “keying” of the surface gives the gel something to grip onto, preventing chipping and lifting. Buffing is also essential when creating a matte base for chrome powders or intricate art designs, ensuring a smooth canvas.
Alcohol and Acetone: The Dynamic Duo of Cleanliness
These two unsung heroes are indispensable for maintaining a pristine work environment and ensuring flawless gel application. Think of them as the cleansing agents that prepare and perfect your nail art.
- Alcohol (80% or Higher): Specifically, the video recommends 99% isopropyl alcohol, as you’re “not paying for water.” Alcohol is primarily used to wipe away the inhibition layer – the sticky, uncured residue left on gel polish after it comes out of the lamp. This sticky layer is normal but needs to be removed before applying the next coat or topcoat to prevent cloudiness or contamination. It also serves as an excellent all-purpose cleanser for your nail tips before any application, ensuring they are free of oils and dust.
- 100% Acetone: This powerful solvent is a multi-tasker. It’s crucial for cleaning brushes, especially those used with gel. It can also be used to remove cured gel (though this requires more patience) and, for advanced artists, can thin out gel polishes for delicate art applications. The emphasis on “100% acetone” is critical, as diluted versions will not effectively penetrate and break down gel polishes.
Lint-Free Wipes: Your Anti-Dust Allies
For any gel artist, lint and dust are the sworn enemy. A stray fiber can ruin an otherwise perfect application, embedding itself into your wet gel and creating an unsightly imperfection. Lint-free wipes are designed to prevent this frustration. While some artists might opt for ripped paper towels, truly lint-free options, especially when soaked with alcohol or acetone, ensure a spotless finish. They are like magic cloths, absorbing excess liquid without leaving any unwanted traces behind.
Gel Products: The Heart of Your Press-On Artistry
This category can feel the most daunting due to the sheer variety, but it’s where your press-on nails truly come to life. The video breaks down the essentials into manageable steps:
- Nude Gels: If you’re creating press-on nails for sale, having two or three diverse nude tones is a wise investment. Nude shades are universally popular, serving as versatile bases or elegant stand-alone colors. The speaker prefers slightly translucent nudes for a more natural look, suggesting that these mimic the natural nail bed better than opaque versions. This preference highlights how personal aesthetic choices can shape your product selection.
- Art Gels (White and Black): These two foundational colors, as highlighted in the video, can unlock a vast array of designs. White and black art gels are perfect for creating intricate lines, crisp French tips, detailed patterns, and bold accents. They are concentrated and offer excellent opacity, making them indispensable for precise nail art. Many artists, like the speaker, find these two colors last a surprisingly long time, proving their value as workhorses in any nail kit.
- Primary Color Gels (Red, Blue, Yellow): For those not ready to invest in an extensive color palette, the video offers a brilliant solution: start with high-quality red, blue, and yellow gels. This trio forms the basis of color theory. With a bit of mixing, you can create a surprisingly broad spectrum of secondary and tertiary colors. Think of it as having a mini artist’s palette at your fingertips, allowing you to blend custom shades for unique designs. The only major exception, as noted, are neon colors, which often require specialized pigments.
- Top Coat: This is the grand finale, the protective layer that seals your design and provides either a glossy or matte finish. The video strongly recommends starting with a decent quality non-wipe top coat. Non-wipe topcoats eliminate the need to cleanse the sticky inhibition layer after curing, streamlining your process. Top coats vary in viscosity (thickness), finish (wipe, non-wipe, matte, glossy), and durability. Researching and experimenting with different brands will help you discover which top coat best meets your specific needs and desired aesthetic for your press-on nails.
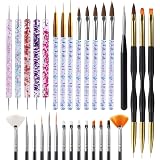
Brushes: Precision Tools for Artistic Expression
Just as a painter relies on their brushes, a press-on nail artist needs a select few to execute their vision. The video highlights four versatile brushes that can handle nearly any art requirement:
- Oval Gel Brush: Essential for applying potted gels smoothly and evenly. Its shape makes it ideal for covering the entire nail tip with a base color or builder gel, ensuring a flawless, bubble-free application.
- Long Liner Brush: Your go-to for precise, elongated lines. Perfect for creating classic French tips, sharp stripes, or any design requiring a steady, continuous stroke. It’s like a fine-tipped pen for your nails.
- Thin Liner Brush: When intricate details call, this brush answers. Its ultra-fine tip allows for delicate patterns, tiny accents, and highly detailed artwork that demands absolute precision.
- Dotting Tool: As its name suggests, this tool is fantastic for creating perfect dots of various sizes. Beyond dots, it can also be used for marbling, placing embellishments, or creating swirling patterns.
Nail Lamp: The Powerhouse Behind Your Cures
The nail lamp is arguably one of the most critical purchases for your press-on nail business. This device cures, or polymerizes, your gel polishes, transforming them from liquid to solid. Without a proper lamp, your gels will remain uncured, sticky, and unusable. It’s the engine that drives your entire gel application process.
While the video links to an external resource for in-depth lamp selection, remember that not all lamps are created equal. Factors like wattage, bulb type (LED, UV, or combined), sensor capabilities, and timer settings all play a role in efficient and thorough curing. A reliable lamp ensures your press-on nails are durable, long-lasting, and truly professional quality.
Adhesion: The Link Between Your Art and the Client
Once your beautiful press-on nails are crafted, your clients need a reliable way to wear them. The two primary methods for safe and effective adhesion are nail glue and nail tabs.
- Nail Glue: For clients seeking extended wear, nail glue is the champion. With proper application, high-quality nail glue can keep press-on nails securely in place for two weeks or even longer. It creates a strong bond, making it ideal for those who want their press-ons to function much like a traditional salon set.
- Nail Tabs: These adhesive tabs offer a temporary, yet secure, hold. They are perfect for clients who prefer to wear their press-on nails for shorter periods, perhaps just for a weekend event or a few days. The video also shares a brilliant alternative use for nail tabs: they are far superior to the tacky putty often provided with nail stands, offering a much firmer grip to hold your nail tips in place during the creation process.
Bonus Item: Packaging – The First Impression
Finally, once your press-on nails are complete, how you present them makes a significant impact, whether for gifting or selling. “You’d be hard-pressed to just hand over a fistful of loose nails,” as the video aptly puts it. Thoughtful packaging elevates your product and enhances the customer experience.
The easiest and most cost-effective method involves mounting your finished press-ons onto a backing card using double-sided tape. While rolls of tape work, pre-cut double-sided tape offers uniformity and ease of use. And remember that unused tacky putty? It finds its perfect purpose here, used on the end of a pen to precisely place nails onto the tape without fingerprints.
The video emphasizes a crucial point: don’t stress over elaborate branding initially. Starting with simple Q cards or even plain paper is perfectly acceptable. The true value lies in the quality of your press-on nails. Focus on creating exceptional products, and refine your packaging and branding as your press-on nail business grows. Many successful artists started with minimal packaging, evolving their aesthetic over time, proving that genuine craftsmanship speaks volumes.
Nailing Your Press-on Business: Your Questions Answered
Why is safety important when making press-on nails?
Safety gear like nitrile gloves protects your skin from chemical exposure from uncured gel, and a face mask prevents you from inhaling fine plastic dust when filing. This helps avoid allergic reactions and long-term health issues.
What are nail tips, and why are they important for press-on nails?
Nail tips are the artificial nails you decorate and serve as the canvas for your press-on nail art. Choosing quality tips in popular shapes and lengths is crucial for creating appealing products for your business.
What are nail stands used for when creating press-on nails?
Nail stands provide a stable platform to securely hold the nail tips while you paint and cure them. This stability helps prevent smudges and ensures precise application of gel polish.
What basic gel products should I start with for my press-on nail business?
Start with a few nude gels for bases, white and black art gels for designs, and a non-wipe top coat. For colors, you can begin with primary gels (red, blue, yellow) to mix a wide spectrum of shades.
How do customers attach the finished press-on nails?
Clients typically use nail glue for long-lasting wear, which can last up to two weeks or more. For temporary wear or shorter periods, adhesive nail tabs are a great option.